With the recent buzz around the iMessage crypto bug from the John’s Hopkins team, several people pointed out that you would need a root CA to make it work. While getting access to the private key for a global root CA is probably hard, getting a device to trust a malicious root CA is sometimes phrased as difficult to do, but really isn’t. (There’s a brief technical note about this in the caveats section at the end.)
In our 2014 Defcon talk where we released the mana toolkit, we pointed out how stupidly easy it was to get a root CA installed on both iOS and Android devices with no hacking required. Two years later, not much has changed in the iOS world, except for a single extra unclear prompt.
The Simple Approach
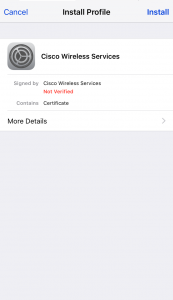
To prompt a user to install a malicious root CA on an iOS device, all you need do is serve a self-signed certificate via HTTP (it has to be self-signed, otherwise it won’t install as a root CA). You just need to serve the file, you don’t even need the right mime-type. In my world, this is most easily done during the captive portal check (made up of two requests to http://captive.apple.com/hotspot-detect.html) when a device first connects to a wifi network, with the bonus being it’s done via the WebSheet and pops up over the user interface. To make things a little more tempting, you can name it something like “Free Wifi Autoconfiguration”. If the user has no pass{code|word} setup (our most likely target group) then the flow looks like this:
1 The prompt to install the self-signed malicious certificate. The red “Not Verified” is the closest sign of danger a non-technical user will see.
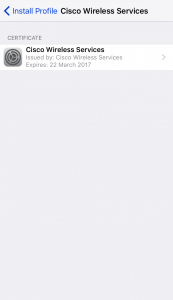
1.1 What you see on clicking “More Details”
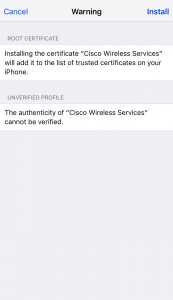
2 The new warning about how it will be added to your trusted certificate store. You’ll notice, that for the average user, this doesn’t say “why” this is bad. Ideally, something like “This will allow someone to intercept and modify much of your encrypted communication.” should be added.
Even to a technical user, it doesn’t make it clear this is being added as a new trusted root, it just says something about it being trusted.
We also see a warning about the profile being unverified, which we’ll make go away later in this post.
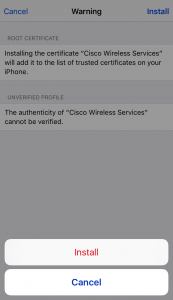
3 The second “Install” prompt. If the user has a passcode or password enabled, they will be prompted for it before this prompt.
4 The certificate is now installed.
That’s a simple 3 step process to the user, and other than some text saying “not verified” it doesn’t really give the user any idea that something bad just happened. At this point, encrypted MitM attacks are feasible, all for the cost of serving a single cert file.
One Step Better
But, let’s take it one step further and see if we can get rid of that red “Not Verified” warning and maybe do a bit more than just add a root CA. In steps Apple’s Configuration Profiles.
First, we put together a simple configuration profile using Apple Configurator 2 or older iPhone Configuration Utility. Both of these generate a simple plist file. In this configuration, I add the same self-signed certificate as a credential and export the configuration to a .mobileprofile, making sure to leave it unsigned and unencrypted. Next, I sign the file using a valid code signing certificate with openssl (as detailed here). Make sure you include the full certificate chain, as the device won’t download and follow the chain itself. Just to show the profile doing something else, I add a hidden network that devices will probe for (and get responded to by mana). Finally, we update our captive portal to serve the .mobileprofile file instead of the certificate. Again, you just serve it, no fancy headers or mime-types required. This is what a user sees.
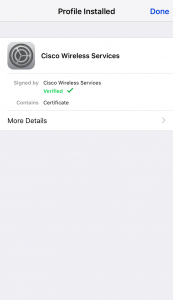
1 What a user is prompted with on connection. Gone is the red “Not Verified” now replaced by a green “Verified” resplendent with a tick due to the profile having been signed , even though it contains a malicious, unverified, root CA. We also get to add some explanatory text to make the user feel more comfortable.
I’ve redacted the signing certificate’s details because I don’t want someone getting it revoked :)
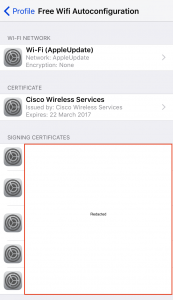
1.1 What you’d see after clicking “More Details”. You’ll notice the wifi-network in included here.
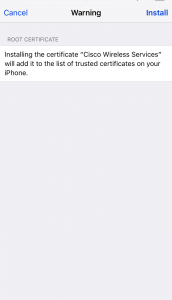
2 The same warning as before about how a certificate will be added to your trusted root store, but gone is the “This profile is unverified” warning. Again, to a non-technical user, this really doesn’t sound scary. To technical users they may even still be fooled since it doesn’t mention that it will be added as a trusted root CA.
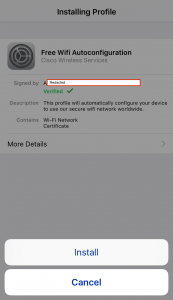
3 The second install prompt. Again, if you have a passcode you’d be prompted to enter that before this.
4 Voila, the profile is installed, and you can MitM away.
Now, this is a malicious profile that’s been installed. You can configure nearly every aspect of an iOS device with a configuration profile, even going so far as to set up a remote MDM server for pushing new profiles down later, as well as doing things like preventing a user from removing it. Of course, additional configs come with additional warnings.
Conclusion
I hope this has demonstrated how easy it can be to push a malicious root CA to an iOS device, making it as a pre-requirement for the iMessage and other such attacks not an implausibly difficult one. For the level of compromise it provides, particularly in the case of a configuration profile, the “overhead” on the attacker is ridiculously low.
Additionally, I really wish Apple would make it clearer to the user what’s going on by explaining what the implication of their choice is, in big red obvious writing as well as encouraging a secure default choice. For example, when doing the same to an Android device, Google introduced a persistent warning in the notifications telling the user that their communications may being intercepted. Of course, none of this will prevent all users from clicking through warnings, but the mobile OS’es need to be following the lead of the browsers, and encouraging users to make good security choices “by default” (think of the big red “this site is insecure” warnings you get for an invalid cert these days) rather than relying on them to make good choices despite the OS’ encouragement.
Caveats specific to the iMessage flaw
I’ve not really been charitable to the interpretation of “requires a root CA”, but it was really just the hook that got me to write this entry. Apple’s fix to the iMessage flaw was to implement certificate pinning on some iMessage requests. This was done around December 2015 according to the Johns Hopkins’ paper. Certificate pinning effectively blocks a MitM of iMessage traffic, by forcing either a specific trust chain or specific certificate to be used. Our malicious certificate will not be part of that chain, nor will the certs we sign with it match the specific cert. That’s why apps such as Twitter and Facebook are also not vulnerable to MitM from this. However, older iOS’ (pre-9) are still vulnerable to this according to the JHU paper. Thus, people claiming this attack requires a root CA’s private key are correct only insofar as they mean on iOS9, which doesn’t make them wrong. The attack against iMessage is much harder than “any root CA” because you’d need to access to a specific, built-in root CA’s private key, or one of Apple’s. In short, the technique described above, will not let you perform the JHU attack against iMessages on updated phones.


